
Push Button Security for Your GitHub Actions
Secure your GitHub Action workflows with a push of a button in HCP Vault

When building CI/CD pipelines, they usually require one or more credentials to access other systems. This leads to credentials being spread across multiple environments or repos to be used by GitHub Actions. This could become a concern as the number of repos increases.
As your use of GitHub Actions scales, you’ll find it increasingly difficult to:
Keep credentials up to date
Manage secret rotation and versioning
Ensure that the principle of least privilege is in place
Work around GitHub limits.
This is where HashiCorp Vault helps. HashiCorp Vault becomes the identity broker and solves this challenge.
However, if I don’t want to build and manage my own Vault platform, what could I do that’s quick, easy, and secure? The answer is I could use HashiCorp Cloud Platform (HCP) Vault. HCP provides Vault-as-a-service, allowing me to quickly get up and running, so I can focus only on the adoption of secure credential management.
HCP Vault can be deployed with the “push of a button” or using Terraform. Let’s explore the workflow between Vault and GitHub Actions.
GitHub Actions Workflow
This chart gives a short overview of the interaction between GitHub and Vault.
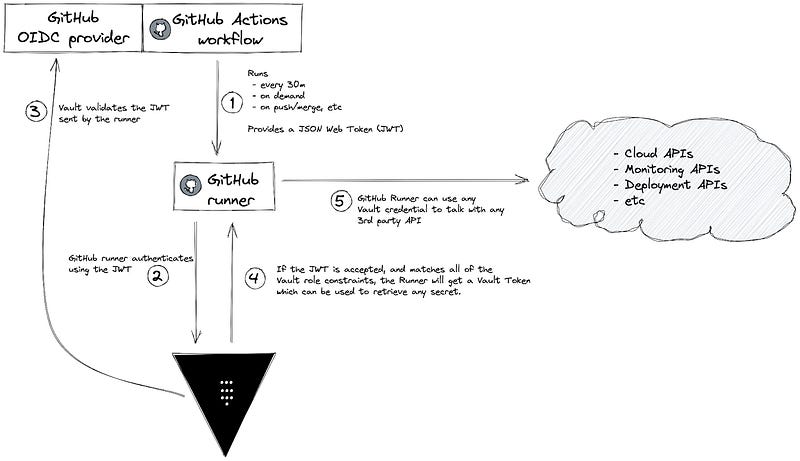
Luckily, steps 1–4 are already taken care of by the Vault GitHub Action, making the integration very clean and simple.
Here’s an example of the GitHub Action YAML:
jobs:
 build:
   permissions:
     contents: read
     id-token: write
   runs-on: self-hosted
   steps:
     - uses: actions/checkout@v2
     - name: Import Secrets
       uses: hashicorp/vault-action@v2.4.0
       with:
         url: https://vault-cluster-private-url.aws.hashicorp.cloud:8200
         namespace: admin
         method: jwt
         role: demo
         secrets: |
           kv/data/ci app_secret | APP_SECRET
In this GitHub Action, I’m using a self-hosted runner to access the private endpoint of HCP Vault. There are some Terraform modules in the Terraform Registry that may help you with the deployment.
Next, we need to enable and set up the JWT authentication in Vault, but for that, we need to first have a look at an example JWT sent by GitHub to understand what will go into our configuration.
Looking at the example JWT, we will use these fields to define 3 main parameters in HashiCorp Vault for the JWT authentication role:
bound_subject: is what is set in the
subfield of the JWT. You can use wildcards in case you want to only allow pull requests or development branches to use this role. From the GitHub documentation, the subject field is determined by the GitHub organization, repository, branch, or the associated job environment.bound_audiences: is what you have under the
audfield of the JWT.user_claim: is related to how you want Vault to identify this client. Vault will create an Entity and a respective Entity Alias using this field from the JWT. You can also use groups_claim if you want to group entities and/or use group policies
Here’s an example of how to set up Vault using the CLI:
# vault_setup.sh

vault auth enable jwt

vault write auth/jwt/config \
     oidc_discovery_url=”https://token.actions.githubusercontent.com” \
     bound_issuer=”https://token.actions.githubusercontent.com” \
     default_role=”demo”

# “user_claim”: “workflow” defines the entity alias.
vault write auth/jwt/role/demo -<<EOF
{
    “role_type”: “jwt”,
    “bound_subject”: “”,
    “bound_claims”: {
        “sub”: [”repo:gitrgoliveira/vault-action-exampleapp:ref:refs/*”]
    },
    “bound_claims_type”: “glob”,
    “bound_audiences”: “https://github.com/gitrgoliveira”,
    “user_claim”: “workflow”,
    “policies”: “vault-action”,
    “ttl”: “1h”

}
EOF
At the Finish Line
After going through these steps, your GitHub Action will be able to access HashiCorp Vault without having to store any shared credentials in GitHub.
Get started with this use case by creating an HCP account today, and have a look at my other blog post where I explore a few use cases for HashiCorp Vault dynamic secrets.